Showing posts with label pork. Show all posts

Saturday, July 31, 2010

MORNING BLISS

Sometimes the little things in life are what matter most. For me, breakfast sausage is one of those little things. I ordained my sausage stuffer by filling it with ground pork, sage, garlic, and ginger, and creating 3 feet of pure joy. It was a huge success, and I am now hopelessly hooked on homemade breakfast meats. I used the recipe for breakfast sausage in the book, "Charcuterie." It was just right, except that I overdid the salt a little tiny bit. The recipe was for 5 pounds of meat, and I used 2 pounds 4 ounces. I just halved the recipe instead of figuring out the exact proportions, which is probably why the salt was a bit heavy.

Here's my 2.25 pounds of diced pork butt, fresh from the freezer. Sage, Garlic, Ginger, Salt, Pepper, and Chile di Arbol were minced together and added to the pork...
Here's the whole setup: kitchenaid mixer with paddle attachment, meat grinder, sausage stuffer, frozen bowl, and ice cold meat...
Once the meat was ground and mixed, it took less than five minutes to stuff it into the casings with my new sausage stuffer... It was like a meat fountain.... amazing!!! The new tool really makes the whole sausage making ordeal quick and easy, removing the most tedious part of the process.....
I cooked the sausages very gently with a little bit of water in the pan...
Once they were cooked through, I cranked up the heat and gave my little babies a nice tan...
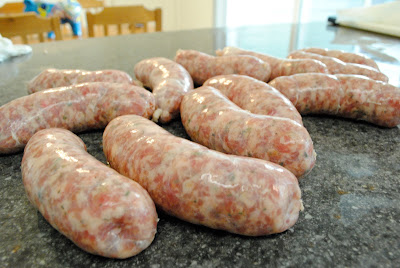
And here they are... moist, tender, flavorful.... a breakfast sausage like none I've ever had before...

Notes for next time? Less salt, more Chile di Arbol.... I used 1/2 tsp in this recipe, and would bump it up to 3/4 next time... the chile gives a nice slow, back of the throat heat that is just perfect in the morning....

I challenge anyone to come up with a better way to start a weekend... It's just not possible as far as I'm concerned.

Sunday, July 11, 2010

PUTTING THE "HAM" IN HAMBURGER

Why's it called a hamburger if there's no ham in it? Today, we had some family coming over, so we decided to make a hamburger that actually had something to do with ham. I chose to grind the meat myself to make sure it was exactly what I wanted. The pink ground meat at the store has all the fat smeared into it, and just can't compete with properly ground, fresh meat. When the store ground meat is cooked, all the fat drips right out of it, but home ground meat retains its moisture because the fat is in tiny chunks that can hold on.

I used about 5.25 pounds of chuck roast to 1.25 pounds of pork shoulder, along with 3 Tbls Seasoned Salt, 2 Tbls Worcestershire Sauce, and 2 Tbls Fresh garlic.

I diced all the meat, mixed in the seasonings, and put it in the freezer for two hours to firm up for grinding. The time in the freezer is essential because it allows the grinder to cut the meat, rather than smash and tear it. After grinding, I mixed the meat a bit with the paddle attachment of my mixer, divided it into 1/2 pound balls, and got to patty making.

I broke each ball in half, folded a slice of american cheese (no other cheese can achieve quite the same liquidy texture as good old american), and sandwiched it inside the middle of each patty.
Here they are completed, with their secret cargoes of cheese...
Then, it was off to the barbecue to cook over medium indirect heat for around 30 minutes. These burgers were so thick that, had I cooked them over the coals, they would have burned on the outside, but been raw in the center. I moved the patties around carefully to make sure that they all got the right amount of heat and browning.

Here are the hammies right after being flipped. As the cheese in the center of each patty begins to melt, it liquifies, seeps through every nook and cranny of the meat, and comes oozing out like lava from heaven.
I topped the patties with more cheese and cooked them to a final temperature of about 160F.
We served the patties with bacon, avocado, and all the usual fixuns...
I think these were the best burger patties I have ever made. I'm definitely a fan of the porky hamburger, and will not be going back to the all beef patty if I have any choice in the matter. The meat just had a great flavor to it that you can't get with beef alone. 

The only thing I would change is the cheese. I thought that american would be perfect since it would liquefy so well, which it did, but something about american cheese with such a premium patty was not quite right. These things deserve a higher class of cheese... possibly something a little milder that will give some nice creaminess, but not mask the taste of the meat too much. .. maybe a gouda or a brie? Anyhew, the american was delicious in its own way, and I have no regrets.

These patties were a hit, and I plan on fine tuning them a bit, but I think I've finally got the burger I've been looking for... all I needed to do was put back the ham.


Saturday, June 26, 2010

RUBADUB

My wife and I have come across a rub recipe that is pretty much always good, on just about any cut of meat, especially pork. It is an anise-garlic rub, and goes a little something like this:

Combine the following in a small bowl:
3 Tbls Olive Oil
2 Tbls Ground Anise Seed (I use a mortar and pestle to grind them)
1 Tblsp Minced Garlic
1 Tblsp Anisette Liqueur
2 tsp Kosher Salt
2 tsp Ground Black Pepper

In this case, we cooked a pork loin, but you can really adapt this to pretty much anything. I brined this pork loin in 1/4 cup salt, 2 Tbls Sugar, and enough water to cover the top of the pork in a gallon ziploc bag. If you do the brine, its best to get the pork in there for about 8 hours, but even half that time makes a difference.

Rinse and dry the meat, then heavily coat it with the rub (I think I doubled the recipe for this pork loin...), then let it rest for 30 minutes or so at room temperature, while your coals are lighting.
Place the pork over direct medium heat, and turn it every 5-10 minutes, until it is brown all over. You want to cook the pork to about 150F in the center. If the meat is getting too dark, move it away from the coals to finish cooking over indirect heat. Depending on the size of the meat, it should take 45-90 minutes or so...
Let the meat rest for at least 5-10 minutes, then slice it into 1/2" medallions. If you like, you can add some olive oil to any leftover rub, and drizzle it over the meat.
I love this recipe because, with a little planning, it is totally doable on a weekday. Something that tastes this good on a weekday is almost a crime...

Sunday, June 20, 2010

THE HOGFATHER

My idea of the perfect day is spending time with the people I love, and waiting all day for a few bites of perfect, juicy, tasty meat. That being said, my first Father's day was a huge success! I spent the whole day hanging out with family and smoking some pulled pork on the barbecue.


The pork preparation began at 10:30 in the morning... I massaged a gorgeous 4 pound pork shoulder with a blend of paprika, kosher salt, new mexico and chipotle chili powders.
I tied the shoulder up with some kitchen twine to help it hold its shape, and let it rest for a good 30 minutes while the coals got going. Once things were properly heated up, I added some mesquite chips and the pork to the grill.

With the pork over a pan of water and very low indirect heat, I checked the meat every hour, and let it cook for about 7 hours.. adding a few coals and adjusting the vents every now and then to maintain the temperature. It cooked to about 180 degrees in the center.

This is what it looked like about two-thirds of the way through cooking:
and here it is fully cooked, before shredding...
Now, I know the meat might look a little burned in the pictures, but I assure you that it was far from it... The black crust that you see is what defines real barbecue... it's called bark, and I think it is the tastiest thing on the entire planet... its kinda like crunchy, smoky, caramelized, bacony heaven. The bark is not only delicious, but it helps contain the deliciousness inside the pork shoulder.
If you click on the pictures and view them full size, you can see where little rivers of bliss have broken through the crusty bark!

From this point, the meat rested for a bit, was shredded, and had some tangy barbecue sauce added to it... We served the meat with coleslaw on a Kaiser roll, and red chard on the side... it was to die for! The only critique I can come up with is that we could have chosen a better bun: the kaiser rolls were a little dry... and something a bit moister and fluffier would have been just the ticket.

In all honesty, this was some of the best tasting meat I've ever eaten. I think the chard, coleslaw, bun, plate, and fork were all just distractions... I would've eaten this meat straight from the grill with both hands tied behind my back if it was my only option.

I think this Father's day thing is really going to work out well for me...

Friday, June 4, 2010

ELEGANCE AND MEAT

We had to go to Whittier for a doctor's appointment yesterday, and on the way home, we followed up a tip on an awesome Italian market, where I had one of the best sandwiches I've had in a long, long time. This market sold imported Bresaola, Coppa Seca, Prosciutto, and Sharp Provolone... all of which went onto the sandwich they made for me. My only regret is that I should have cut back on the standard toppings to let these fine meats have the center stage they deserved... the mustard, peperoncinis, etc, masked some of the subtle flavors of the meat Next time, I'm going for meat, mayo, tomato, and a little lettuce. Also, I loved the flavor of the sharp provolone, but it, too, took away from the meat. Next time, I'm going to inquire about bufala mozzarella, which would just be completely ridiculous.

We also got some sliced meat to bring home... My wife and I both decided that the Coppa Seca was our favorite. Here are a few pictures of the cuts in our fridge so that you can see what we're talking about...

This is Bresaola. It is a cured beef top round, and has a texture similar to prosciutto, except leaner and meatier. This is my second favorite cured meat.

This is the Coppa Seca. It comes from the portion of the pig that is just forward of the tenderloin, over the shoulder. This was our favorite cut. It falls somewhere between prosciutto and bresaola, in that it has some nice meatiness to it, but isn't too rich, either. I like that the fat is incorporated within the slice, instead of on the outer edge, like prosciutto.. it gives you a more balanced fattiness in every bite.

We also got some Salame, which deserves an honorable mention, although, in my opinion, the art form that is Coppa cannot be contended with... This salame was some of the best I've had, with really tasty seasonings, and just the right amount of acidity.

Our dinner last night made my already great day. We had Garruch di Pumarole (which deserves its own blog post), with a side of these incredible meats and a little Chianti....  The world suddenly just seems so right. One day, I hope to make all three of these delicious works of art on my own.... but until then, I plan on doing lots of research ;)

Tuesday, June 1, 2010

THIS LITTLE PIGGY WENT SOUTH

I decided to make some Chile Verde to make this Memorial Day feel like a holiday, instead of blending in with every other day. My wife requested Chile Verde, and my brother has been asking me to post the recipe for a while now.... so here it is! (I have to confess, this recipe is not my own, but it sure is darn tasty!)

First things first... Put two big handfuls of hickory chips in a bowl of water to start soaking.

Start with a 5 pound pork shoulder. Give it a little massage with: 1 Tbs Kosher Salt, 2 tsp Pure Chile Powder, 2 tsp Oregano, 1 tsp Granulated Garlic, and 1 tsp Cumin, then wrap it in plastic wrap and let it rest for 30 minutes or so on the counter. This would be a good time to get about 30 coals lit in your barbecue.

Once the coals are hot, move half of them over to the opposite side of the barbecue, and place a pan of warm water between them. We're going for even, moist heat, and this should do the trick. If the coals are looking a little meager, add 4 or 5 per side. 

Drain the wood chips and put them on the two piles of coals. You don't want to spread them all out, which can lead to flames and bitter soot. Instead, place the chips in little concentrated piles so that they will smolder. Quickly add the pork over the water pan, and close the lid. I leave the top and bottom vents halfway open, which keeps my barbecue right around the 350F range...
Don't touch anything for 30 minutes. Don't open the lid. Don't even peek. This is a good time to make the sauce....
Puree 8 Tomatillos, 1 (7 oz) can Green Chiles, 4 Cloves Garlic, 1 small Onion, 2 tsp Oregano, 3/4 cup Dark Beer (Like Modelo Negro or Bohemia), and a fresh chile, depending on the heat you're looking for. I used half a Serrano, which seems like a good compromise if you have folks who don't like things too spicy. Pour this mixture into a foil pan, then you can go ahead and crack open the barbecue. 

This is what you should see....
Resist the urge to stand there and admire your creation. To avoid losing all your heat, you need to work quickly. Plop the pork into the pan of sauce, cover it with foil, add a few coals to each pile, and slam the lid back on as quickly as possible. Come back in an hour, rotate the pan 180 degrees, add some coals, and leave for another hour. Continue this process until the pork hits 190 F in the center... It should take 2-3 hours if you've got the temperature right.

Crack open the foil, and squeal with delight if no one else is around to laugh at you. 
At this point, you should remove any hunks of fat and gristle, and shred the pork into good sized chunks.  Drain as much fat as you can off the sauce, and put everything together in a pot. Simmer the concoction down a little bit, add 1/4 cup chopped cilantro, and add salt and chipotle tabasco sauce to taste. We like this dish best served over white rice with sour cream, chipotle tabasco, and limes. But its pretty good on a fork, too....


Wednesday, March 3, 2010

OUR LITTLE 6 POUNDS, 8 OUNCES OF JOY

The realization shocks and apalls me, but, until this past Saturday, I had never even tried to make legitimate ribs in my entire life. Wow. Well, that all changed when we invited my parents over for dinner. We knew we wanted to barbecue something, but when my wife came home from costco with a giant pack of the meatiest baby back ribs I've ever seen, I knew that our ribless little lives had just changed forever...

I chose a three part recipe... rub, mop, and sauce. The rub was mostly new mexico chile powder, salt, paprika, and granulated garlic. The mop was a mixture of melted butter, apple juice, cider vinegar, and barbecue sauce, and the barbecue sauce was made with ketchup, apple juice, vinegar, molasses, and a whole bunch of spices (mostly chile powder and gralic). The part of this whole process that I am most proud of is my improvised rib rack, made by attaching bolts covered in foil to the cooking grate on my weber.
Here are the ribs covered in rub:
And the Mop and Sauce:

Here is a picture of the ribs after smoking over hickory at about 200 degrees for one hour. You can see my sweet new rib rack, and if you look closely, you can see the coal setup... just 15 or so coals, set way off to one side, with a handful of wet woodchips (not scattered, but set down in a heap on top of the coals so that they smolder slowly)... I used two large handfuls throughout the cooking process.... 
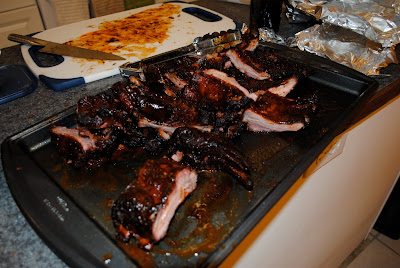
And here are our finished little babies after 4 and a half hours in the barbecue.... sooo tasty.......
Here they are again, all cut up and ready for battle. Not a great picture, but you can kind of see the pink smoke ring on them if you look carefully....

These things came out really, really well... but, as always, I need to make a few changes next time:
1) Start the ribs first thing in the morning, and reheat them with the barbecue sauce over hot coals when its time to eat them. They were not at all tough, but they just weren't quite falling off the bone, and I would have liked to cook them longer, but it was time to eat....
2) I thought the ribs were burning because a few spots were looking black, but they were nowhere near overcooked.... A little black is totally fine, as long as it isn't looking like charcoal (especially at the bone tips)....
3) More spicy! The new mexico chile powder really has no kick, even though it was advertised as being between cayenne and paprika. No heat at all, which made me sad inside.
4) Try a milder wood like cherry or pecan. I liked the hickory, but it was much stronger the next day... not a bad thing, but I think a more subtle, slightly sweeter smoke flavor would be a little better...
5) Double the barbecue sauce recipe, and reduce half of it down so that it is thick and goopy. Use the normal, unreduced half to coat the ribs on the grill, and serve up the thickened half on the table for dipping and/or slathering.


Thursday, January 28, 2010

BUILDING, HANGING, AND BLTING

Just a quick update on my progress.... Last night, I managed to get my workbench into position, build a wall board, and hang most of my hand tools. I also installed a fishing pole rack that is nicely holding about 50% of my fishing rods.

Tonight, I'm hoping to finish hanging all my tools, build a shelf for the laundry area, build an overhead lumber rack, and re-wire my table saw for 110 Volts. It's all starting to come together, and I'm beginning to think that I just might make it...

On a side note, my wife made us some homemade bacon BLT's for dinner last night... AMAZING!!! The thickness of the bacon made it really stand out in the sandwich, instead of disappearing into the bread and tomato. Sadly, though, the homemade bacon supply is spent. We have one salty end piece left, which we're planning to use as an ingredient in some sort of soup or stew. I guess I'll need to make a bigger piece next time so that I have more to share...

Monday, January 25, 2010

HOMEMADE BACON

On Saturday morning, I finally completed my first slab of bacon. I lightly smoked the slab with Pecan chips, and recruited some family members to test the bacon with me (and to ensure that I wouldn't die alone if it all went wrong)I have to say, it was wonderful! The bacon was thick, flavorful, and even juicy...You just can't get anything like it in a store, and I'll definitely be making this again.

A few notes for next time...
  • I decided not to let the bacon develop a pellicle. Since I didn't use any nitrates, I just couldn't bring myself to leave the meat exposed like that. There was still plenty of smoky flavor for my taste.
  • The sides of the bacon slab are extremely salty. Next time, cut 1/4" off each side, and save this saltier portion for use as an ingredient in something like soup. (I was devastated when I first tasted the bacon because it was so salty, but it turned out to be fine as I got away from the exposed edge.
  • I ended up smoking the meat on the morning of the 8th day. Next time, I think I should remove the cure on the morning of the 6th day, as the bacon is slightly over salted.
  • Since I didn't use any nitrates, I smoked the bacon at about 300F instead of 200F to cut down the cooking time and avoid bacteria growth... I didn't notice any negative effects from doing this...
Here are the pictures... I went a little overboard, but I just can't help myself when it comes to delicious food...

The bacon in its cure... note the amount of liquid in the bag...

The cured, unsmoked slab of bacon...

halfway through smoking...

Internal temperature at 150F...

Mmmmmmmm........

Into the pan....

Into the mouth...

Sunday, January 17, 2010

WAITING ON THE CURE

It has begun! My 2.5 pound black hog belly was fully defrosted on Friday night, so I started the curing process. Here is a picture of the belly before I did anything to it. It is 2" thick, and looks gorgeous. There are a couple rib bones you can see in the back of the picture, but they are small, and I will remove them before I slice the bacon...I haven't decided on the right time yet...

And this is the pork belly, coated in a mixture of equal parts salt and sugar. I heavily coated the meat, then threw a little extra in the bag for good measure.

The pork will sit in its cure for 7 days. I'm flipping it over every day and making sure that the liquid forming in the bag stays in contact with the meat. Next Friday, I'll put the uncovered, rinsed meat on a wire rack in the fridge overnight to form a "pellicle", or sticky coating which will help smoke adhere to the meat. On Saturday morning, I'll fire up the smoker, fulfilling this pork belly's ultimate destiny....

Thursday, January 14, 2010

THE HAPS

We've got a lot going on at the moment, but here are a few headlines....

Our landlord is going to let us move into our new place early, with no extra payments or fees! I couldn't wait to get started, so this is just thrilling for me. We are supposed to get the keys tonight, and I couldn't be more excited! We'll have a full four weeks to get our stuff from one house to the other, and I'm really looking forward to doing this move as easily and gently as possible.

Every now and then, my wife and I like to host a weekend family breakfast at our house. It's a nice way to get family together and a good outlet for some of our baking bugs. This time, it looks like we're doing bagels, and we'll probably serve up some eggs and spinach, benedict style to go with them. I really love making bagels, and will post the process of making them next week sometime. We went and got some dehydrated onion, dehydrated garlic, sesame, fennel and poppy seeds, so now, we can make our two favorites: salt bagels, and everything bagels. I'll be starting the dough tonight for our Sunday morning feast. Very exciting.
Last night, we went to Barnes and Noble and did some book browsing. Lo and behold, they had one copy of the Charcuterie book I've been lusting after! It is incredible. There are recipes for everything from pickles to saurkraut to salami to duck confit to head cheese (ew). I can't wait to try a few of these as soon as I can get my hands on a meat grinder. Mortadella is at the very top of my list, as it has always been one of my favorites (the real Italian stuff....not the cheap bologna kind they sell at Vons). Thanks to a very generous Barnes and Noble gift card, my wife and I left with a nice selection of books that we are both excited about.

We've got a lot going on these days, but I'm feeling more motivated and more excited about the things that are keeping us busy, so it is definitely a good thing...

Wednesday, January 13, 2010

THE PIGGY IS IN THE NEST

OH YEAH.... The bacon has landed... I repeat... the bacon has landed.

Last night, at 9:30, after a class my wife and I are taking, we went to the Freshia Korean market, and by god, they had the pork belly. They had it in slices, they had it in chunks, they had it in pieces, and they had it whole. It was everywhere, like frozen pizzas at an Albertson's. Amazing. If I ever need an odd cut of meat in the future, I'm heading straight to the Asian markets.

Unfortunately, the meat department manager had gone home for the day, so I couldn't get a custom sized piece off a whole belly (which they DID have in stock), but I did manage to find a 2.5 pound piece of pork that looks gorgeous, for around $3.50 a pound. It is labeled "black hog", is about 5 or 6 inches wide, and is almost a full 2 inches thick... these are going to be some impressive slices of bacon!

Unfortunately, it was frozen, but I think that will be okay, at least for my first attempt. I just couldn't get over how wide and delicious the future bacon slices looked. I was a little disappointed to notice when I got home that it looks like there could be a couple small bones runnning through one part of the meat. I can't really tell until it defrosts, but it looks like it is pretty close to the surface, and should be easy to trim away...

So... my little slice of heaven is hanging out in the fridge for a few days to defrost, and by around Friday afternoon, it should be ready to head down the path of porky greatness. I'll keep you posted on its progress as things get going....

Tuesday, January 12, 2010

CHARCUTERIE TOMFOOLERY

Oh, brother... I think I have my next obsession brewing, and there's really nothing I can do to stop it... Home Charcuterie.

Home charcuterie is basically the process of making cured meats at home. It all started with the bacon. While I was researching bacon recipes, I kept coming across a book called "Charcuterie: The craft of Salting, Smoking, and Curing". I did a little research on the book and its subject, and have been slowly becoming more and more obsessed.

It turns out that bacon, sausage, and even mortadella are at the beginner end of the charcuterie spectrum, while salami, prosciutto, bresaola, and other similar items are on the more advanced end. With the equipment I have right now, I think I can wade into the beginner stuff right away, (the ones that don't require long term dry curing), but the more advanced items are going to take some planning.

The first order of business is to get the bacon made. Once I've got that under my belt, I'm going to need to buy myself the book I mentioned above, along with a meat grinder. From there, I can attempt a few types of sausages, then maybe a mortadella or two.

My real goal is to make salami, bresaola, and prosciuttio, and to do that, I'll need to save up for a small refrigerator, a temperature controller, and a temperature/humidity monitor. The goal is to end up with an environment that is about 50-60 degrees and ~70% humidity. I think the curing box could be put together for about 200 bucks or so. Also, this type of refrigerator would be perfect as a cheese cave, so I could use it to pursue that old dream at some point as well.

I feel like I'm a little nuts because of the way I get into things sometimes, but I'm starting to see a common thread forming... they're all delicious, difficult, and extremely time consuming. The day when I combine my cheesemaking, bread baking, smoking, lobstering, and charcuterie interests into a single meal that I eat on a handmade table, in a hand fitted chair, will probably bring me to tears. I think my subconscious is orchestrating the perfect meal without my knowledge, so I'm just gonna go with it for now and not ask too many questions....

Monday, January 11, 2010

BRINGIN' HOME THE BACON

It turns out that pork belly is kinda hard to find. I visited 3 meat counters, and called about 5 others to no avail. My only option thus far is to special order pork belly from Bristol Farms for about 3 bucks a pound, which isn't bad, considering that good bacon goes for about 7+ bucks a pound. Sadly, my bacon making will have to be put on hold for a while longer. I think I'll place that order tonight, which will put me in bacon land a few weeks later than I expected... I'm hoping the wait will make it that much more delicious when my day of glory finally arrives...

Friday, January 8, 2010

THE NEED FOR A CURE

I am completely obsessed with the idea of curing my own bacon, so I've been doing some research on the subject. After reading several articles about making bacon, I've combined and compared the different techniques, and come up with these steps to follow:
  • Buy a pork belly, with skin on, that weighs about 5 pounds. You want the back portion of the belly if possible, as it should be meatier than the front end.
  • Generously rub equal parts Kosher Salt, Sugar, and Maple Syrup(optional) into all sides of the belly, along with any other spices or flavoring you want...I'm thinking some Sambal Oelek or Sriracha would be amazing....
  • Put the belly in a ziploc bag, put it in the fridge, and flip it over every 2 days for seven days.
  • On the seventh day, rinse and dry the meat.
  • Place the meat on a wire rack, and refrigerate, uncovered for 12-24 hours.
  • Smoke, skin side up, at 200 degrees until the internal temperature hits 150 degrees, about 3 hours.
  • Remove the skin, leaving as much fat intact as possible.
  • Either slice the bacon and cook it, or cut it into manageable chunks to be frozen and sliced later.
  • Bacon can be stored in the fridge for about 7 days, and will last in the freezer for about 3 months.
It looks like it is going to take around 8 1/2 days to cure the pork... If I start tonight, I just might be in hog heaven on Sunday morning....Time to go talk to a butcher and get this little piggy home!!!

Tuesday, December 22, 2009

PASS THE PORK

If you know anything about me, you know that I like to cook food slowly. The more elaborate and time consuming a recipe is, the more interested I become with making and eating it. One of the tastiest and easiest ways to give slow food a try is to make tasty tasty carnitas.

Don't worry too much about the ingredient amounts you use. You can modify the spices to suit your taste, and it should come out just fine. Make sure you have a friend or two, a few movies, and some mexican beers along for the ride. This is pretty hard to mess up, so man up, drive yourself to the nearest butcher, buy the biggest piece of pork you can find, and settle in for day of meaty anticipation.

3-4 pounds Pork Butt (or Pork Shoulder, its the same thing...bone in is just as good as the de-boned variety except that the bone in version will cook a little faster)
Cumin
Kosher Salt (Try not to dwell on the irony for too long here)
Black Pepper
Cayenne Pepper
Minced Garlic
6 Limes (at least)
  • Heat your oven to 500.
  • Rinse the pork off with cold water and pat it dry with paper towels.
  • Rub equal amounts of the spices onto all sides of the meat. Just eyeball it. You want a nice healthy layer of spices here.
  • Rub minced garlic all over the meat... again, just use your own judgement on the amount, and please, please, DO NOT buy pre-minced garlic in a jar. I don't know what they make that stuff from, but that is not garlic.
  • Put your happy, massaged meat into a deep pan that hugs the meat pretty closely. Think pork hot tub, not pork swimming pool.
  • Squeeze two of the limes over the meat, and put it in the oven for 20 minutes.
  • Turn the heat down to 275 and let your masterpiece cook for about 8 hours. This time is just an estimate. It takes what it takes, so don't stress if it is taking longer or done sooner. 
  • Baste the meat every 30 minutes with its own juices, as well as a fresh squeeze of lime juice. Use about 1/4 of a lime or so for every basting.
  • Around the 6 hour mark, you might develop a bond with the pork. Don't resist the temptation to name it, as this is perfectly normal.
  • Towards the end, you can keep your bastings at 30 minutes, but if you really want to go for it, start basting every 20 minutes, then every 15.
  • You'll know that its done when the meat has slowly expanded slightly, and then shrinks. You should be able to easily shred it with a fork.
  • Shred the meat into a bowl, and add the drippings to taste.
  • Whenever you're ready to eat, re-fry the meat in hot vegetable oil. Don't turn it too much here... Just let it sit, then flip it all when it is nice and brown (Think...pancake, not scrambled egg). You'll probably need to do this in a few batches.
  • Serve with tortillas, fresh salsa, and beans.
  • Try not to cry when you taste that first succulent bite... trust me, its embarrassing for everyone in the room.

Tuesday, December 15, 2009

TASTY TASTY MURDER

I'm convinced that Paula Deen is trying to kill me and everyone in my family. I came to this reallization slowly, but it is all making sense now....

First, it was the Krispy Kreme burger, a 1/2 pound burger topped with cheese, bacon, and a fried egg, all encased in a glazed donut bun. I thought, "wow, this lady is sick," but I let it go at that without too much further thought.

A little while later, I came across her deep fried stuffing sticks... buttery stuffing full of breakfast sausage, pressed around a stick, and deep fried like a corn dog. I wondered, "how is this lady even alive right now? That does sound pretty tasty, though..."

I started to get suspicious when deep fried mac and cheese came on the scene. Giant squares of already heart stoppingly delicious mac and cheese are wrapped with bacon, coated in cracker crust, and deep fried. My conscience said, "wow, that actually sounds kind of good, but I could never... no...that is just sick."

And then I discovered her deep fried ham. She takes an entire ham, with the skin on, deep fries it, and coats it with a sugary glaze. Without thinking, the Steve inside my head went..."my brother in law has a deep fryer... I wonder what we're all going to eat for the New Year... and I wonder where a person can buy a large ham with the skin on??"

And that's where it hit me... Only one of two possibilities can be true:
Either Paula Deen somehow fell in love with me and is trying to capture my heart, or she is an evil genius bent on mass destruction. But she couldn't be in love with me...if she had a heart, it would have clogged and stopped years ago.

The only logical conclusion is that Paula Deen is a murdering zombie, and her deep fried ham is the ultimate weapon of mass destruction, set to go off at the next family gathering...

Here's the recipe for the ham from food network...

Brine:
1 gallon water
1 gallon apple cider
1 cup dark brown sugar
1 cup kosher salt
2 cinnamon sticks
4 cloves
10 pound uncooked ham
Peanut oil, for frying, about 5 gallons
Glaze:
3 cups pineapple juice
1 (8-ounce) can crushed pineapple with juice
1/2 cup Dijon mustard
1 cup dark brown sugar
1/2 cup honey
Directions: In a large plastic tub, place all of the brine ingredients and stir until dissolved. Place the ham in the brine and refrigerate overnight. The following day, take the ham out of the brine and dry well.
Fill your turkey fryer with the peanut oil. Heat the oil to 375 degrees F. Place the ham carefully inside the fryer. Cook for 7 1/2 minutes per pound. The ham will be cooked when it is 160 degrees F. inside. Remove the ham carefully, letting it cool off and drain of excess oil for about 10 to 15 minutes.
Glaze: Combine all the ingredients in a medium saucepan on low heat and let reduce until a syrupy consistency. Let the glaze cool slightly and then pour it over the deep fried ham. Serve any extra glaze on the side to the victims.

"I'm not gonna hurt Y'all... who wants a snack???